
Estimated reading time: 8 minutes
Google Analytics is the best form of website analytics available. If you have a WordPress website and want to know how well it is performing, you need to install Google Analytics. But you could be wondering how to add Google Analytics to WordPress. Well, read on to find out.
How To Install Google Analytics On WordPress
There are typically two ways that you can install Google Analytics on WordPress; manually by adding the tracking code to your websites header file, or via a third-party plugin.
I will talk you through the process of both. In most situations, and as a WordPress developer myself, I would always avoid adding more plugins to your WordPress website as to not ‘bloat’ your site out. However, I feel differently when it comes to adding Google Analytics to WordPress and in this article, you will see why.
If you want to find out more about Google Analytics itself and how to use it, you may want to check out our guide on understanding Google Analytics for beginners.
How To Add Google Analytics To WordPress Without A Plugin
Firstly, I will show you how to add Google Analytics to WordPress without a plugin. This is the best option if you want to avoid adding more plugins to WordPress to keep your website as light-weight as possible.
To do this, we need to take the tracking code that Google Analytics provides and add it to the header.php file that comes with WordPress.
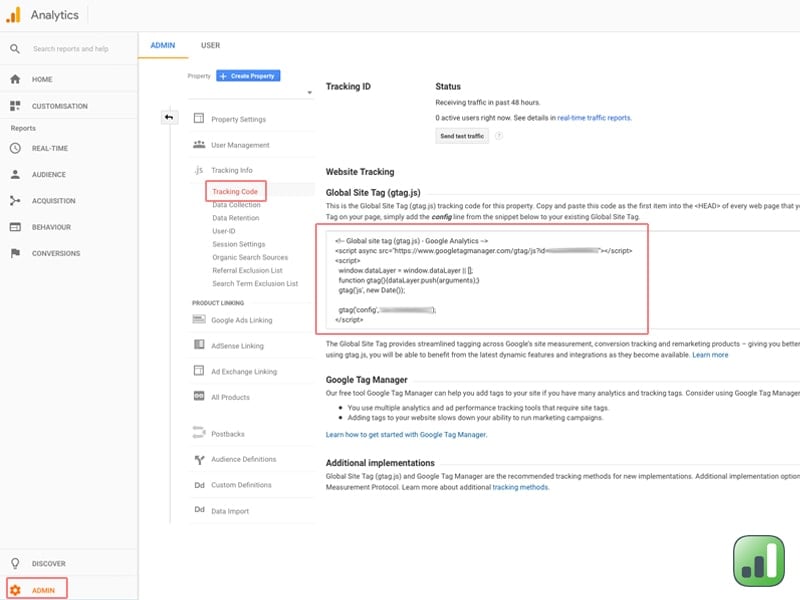
Step 1: Locate & Copy Your Tracking Code
Login to your Google Analytics account and go to ‘Admin’ – ‘Tracking Info’ – ‘Tracking Code’. On this screen, you will be presented with the global site tag which you simply need to copy to your computer’s clipboard.
Step 2: Locate Your Header File & Paste The Code
Next, log in to your WordPress website and go to ‘Appearance’ – ‘Editor’ and locate the file called ‘Theme Header (header.php)’ under the list of your theme file on the right side of the screen.
Once you click on this file, you need to find the start of the head section of your website. To do this, find the code <head>, which will be right at the top of the page. Immediately after this opening head tag, paste your tracking code.

Once you have done this, simply click the ‘Update File’ button at the bottom to save your changes.
How To Add Google Analytics To WordPress With A Plugin
The alternative option is to use a plugin when looking at how to install Google Analytics on WordPress. You may be thinking that installing the tracking code manually via the steps above was simple enough, so why would you need a plugin to do this.
Well, when you add the tracking code manually, all you are doing is adding the basic code that enables Google to track traffic to your website. However, if you really want to unlock the true power of Google Analytics, going beyond the standard tracking code will enable you to unlock an entire host of powerful features.
If you want to take advantage of the more advanced aspects of Google Analytics, like an event or AMP tracking, then I highly recommend the Google Analytics for WordPress by MonsterInsights plugin.

This plugin is extremely easy to use, is lightweight and will help you to unlock a load of features that you wouldn’t have even thought was possible.
I will make it clear that all the features that this plugin gives you are possible without a plugin, but it involves more advanced knowledge of coding. This is because you would need to make modifications to the standard tracking code as well as make various modifications to your website.
For example, to add event tracking on your WordPress website, which is used to track things like email or phone call clicks, you would need to add additional tracking code to each and every link on your site, which is time-consuming.
To find out more about event tracking, take a read of this post: how to setup Google Analytics event tracking.
However, the Google Analytics for WordPress by MonsterInsights plugin does this all for you by running some additional JavaScript tracking that can automatically track when someone clicks on a link within your content. But, as you will see below, the list of benefits doesn’t stop there.
Step 1: Install The Plugin
To get started, go to ‘Plugins’ and click the ‘Add New’ button at the top of the window. In the search box in the top right, type in “google analytics” and press enter on your keyboard.
From the list of results, you will see the Google Analytics for WordPress by MonsterInsights plugin. Simply click the ‘Install Now’ button and then ‘Activate’ to successfully install the plugin onto your site.

Step 2: Authenticate The Plugin
Once the plugin is installed and active, you will see a new item in the left-hand menu called ‘Insights’ and some messages appear at the top of your dashboard asking you to configure the plugin.
You can either click the ‘please configure your Google Analytics settings’ link at the top of your dashboard, or go to ‘Insights’ – ‘Settings’ menu, where you will be taken to the ‘General’ settings page.
Once on this page, you will see a big button that says ‘authenticate with your Google account’. Click this button and follow the on-screen steps to link the plugin with your Google Analytics account.

Once you have authenticated the plugin, I would also suggest setting the ‘Automatic Updates’ to ‘Yes’. This will ensure the plugin is kept up-to-date with the latest features, bug fixes and security patches.
Step 3: Configure The Plugin
For the purpose of this guide, I will be using the free version of the plugin, which should be ample for most situations. However, there are many additional features that the paid version offers, so you may want to take a look yourself to see what version suits your needs the best.
From the plugin settings screen, click the ‘Tracking’ tab at the top. You will then find yourself on the ‘Engagement’ page.

From this screen, you can set two things:
- Ignore these user roles from tracking – here, you can set the plugin not to track logged in users with certain roles. This is one of the most useful features of the plugin, as by default Google Analytics will track all visitors to your site; this includes yourself and your other admins. However, you don’t really want to be tracking how many times you or your team visits your site, as it will falsify your traffic stats. So, by setting your user roles up here, you can omit them from being tracked.
- Enable MonsterInsights event tracking – this is my personal favourite part of this plugin. Make sure this is set to ‘Yes (Recommended)’ which will enable the plugin to automatically track each time someone clicks a link on your site. This includes outbound links, affiliate links, emails, phone numbers and download links. This feature is seriously so powerful, as the data is sent to Google Analytics as an event, of which you can then build goals to track conversions.
To set up the events as goals, make sure you read this post: how to setup Google Analytics event tracking.
This covers the basics of the plugin, and when setting this up for clients I leave all other settings to their defaults. But by browsing the settings tabs on the left side of the screen, you can see all the other things this plugin can do.
So, have a play around with it and if you are anything like me, you will find that you end up falling in love with Google Analytics all over again.
Test Your Work
Whatever method of adding Google Analytics to WordPress you have chosen, it is a good idea to test that the tracking code is actually working. To do this, log in to your Google Analytics account and go to ‘Real Time’ – ‘Overview’. Load up your website in a new window or tab, and then check that your session is showing on the active users right now section. If you see your visit being recorded, then congratulations you have set up everything correctly.
Remember, if you have installed your tracking code via the plugin, you will probably need to log out of the WordPress admin first if you have set admin users to not be tracked, else your session will not be recorded.
You can also check your events in real-time too, by going to ‘Real Time’ – ‘Events’. Then, click on one of the links on your website and watch to see if the event is being tracked.
I will be interested to hear your thoughts on this plugin, especially those of you who have paid for the Pro version and using some of its more advanced features. So, please do leave your comments below and I will get back to you.